Deviation Actions


Description
Download for a full-size version.
facebook.com/SisuSquid for more tutorials, progress pictures, giveaways and general randomness!
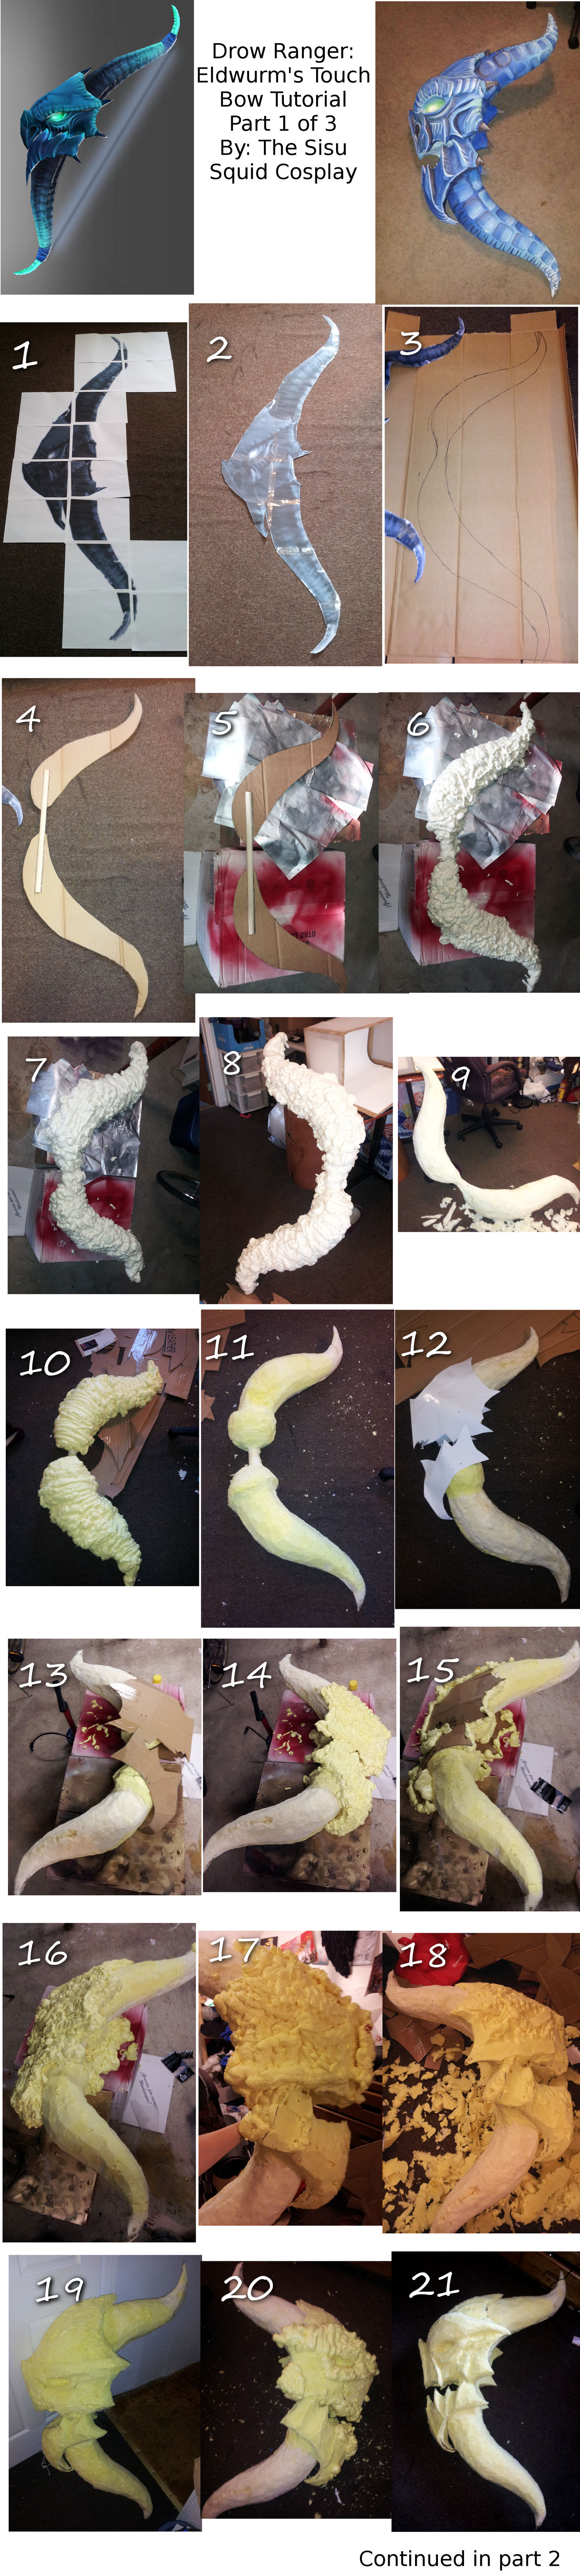
Intro: I've received many questions about how I made my Drow Ranger bow since it first debuted at the Dota2 Internationals in August. Usually I'll joke and say that I simply forced it into being and have no idea how I actually manage to make it, but the reality of it is the bow was a long and difficult project with many lessons learned throughout its creation. Let me pass on those lessons to you and if you have any questions, please feel free to ask! Also, it's important to note that while I do have several years of real world art experience under my belt, I'm in no means the end all when it comes to making stuff like this. You may discover a better, smarter way to make your own bow someday and by all means, you should do that! This was made for the fun of it, and I'm glad it somehow, despite all odds, actually turned out in the end.
Good luck crafting!
1) I found a DotA 2 item viewer and took a screen shot the bow. I then printed out the bow full-scale and organized the pieces.
2) Cut out the bow.
3) I then cut the paper pattern in the middle and bent it back where the dragon's mouth would open. This way I could simulate the mouth always being open so you could see the arrow within. I then traced the pattern onto cardboard.
4) Cut the cardboard out and add a dowel rod, hot glued, into the middle for a sturdy handle.
5) Prepare for adding Great Stuff.
6) Start adding layers of Great Stuff! Be patient with it as it's no fun to get in on your clothes or skin if it's still tacky. You can learn more about Great Stuff in my tutorial on it here: sisusquid.deviantart.com/art/G…
7) Add more Great Stuff after the first layers dry. I think I used about 10 cans on the bow when all was said and done.
8) How the bow looked after about 4 cans of Great Stuff.
9) Start carving! Using a sharp utility blade is very helpful. And patience. Lots and lots of patience.
10) The bow was too thin, especially where I needed to attach the dragon head, so I had to add about 4 more cans of Great Stuff.
11) More carving! Note the bulbous areas near the handle to give the dragon head a bit more dimension once attached.
12) Figure out the paper form for the dragon head. This was honestly probably the hardest part of the whole project for me.
13) Transfer the paper pattern to cardboard and pin the cardboard to the foam.
14) More Great Stuff!
15) Even more Great Stuff!
16) Even even more Great Stuff!
17) Begin carving dragon head.
18) Continue carving, making a huge mess.
19) Preliminary carving is done, but I over-carved in a few areas and needed more dimension in others. So it's time for...
20) MORE GREAT STUFF.
21) Finish carving the bow and it's ready to be sealed!